How to Add IDX MLS Listings to Your Webflow Website Without Coding
If you already have a real estate website built in Webflow and want to add live MLS listings—this guide shows you how to do it in just a few minutes, without changing your design or writing any code.
By connecting IDX Broker to your site through IDX Plugin, you'll bring in powerful real estate tools like property search, listing displays, and a full lead capture system—with popups, saved searches, and user accounts—all working directly inside your existing layout.
The widgets fit right into your current design and load smoothly without affecting your Webflow performance, since all MLS pages are handled separately by IDX Broker but still display with your own header and footer. Visitors can use flexible search filters across different property types, including price, beds, baths, and many advanced options.
Once set up, everything updates automatically—new listings, price changes, and availability sync directly from your MLS. The whole setup takes just a few minutes once your IDX Broker account is connected to IDX Plugin.
What you get with Webflow + IDX integration
- • A Webflow website that displays live, auto-updating MLS listings from your IDX Broker feed
- • A powerful, mobile-friendly search form with smart filters and location autocomplete that encourages users to search
- • Visually appealing listing cards you can place anywhere on your homepage or custom pages (e.g. built for particular locations in your area)
- • IDX search results, property detail pages, and tools like home valuation or schedule a showing all using your Webflow site's navigation and footer—keeping your branding consistent
- • Lead generation tools like forms, popups, and user panels to save listings—built right into your website
- • SEO-friendly listing pages that can be indexed by Google, helping your site rank for local real estate keywords
- • A solution that doesn't overload your Webflow hosting—MLS data is hosted and managed by IDX Broker
- • No need to build or sync your own database—all listings are managed automatically
- • $100 IDX Broker setup fee waived when you register through our partner link
- • Setup in under 10 minutes if you already have an IDX Broker account
What You'll Need
A Webflow project with a paid plan
(we're using the "Basic" one)
An IDX Broker account
→ Register here: https://idxplugin.com/get-started-with-idx-broker
A free IDX Plugin account
→ Register here: https://dashboard.idxplugin.com/register
Step-by-Step Integration Process
Step 1: Add a Live MLS Search Form to Your Webflow Homepage
Visitors expect to start searching immediately. With IDX Plugin, you can embed a responsive, MLS-powered search form directly into your Webflow homepage using a single code snippet. The form includes location autocomplete and user-friendly filters for beds, baths, price, and more. Once a visitor clicks the search button, they'll be redirected to live MLS results powered by your IDX Broker account.
1. Log in to your IDX Plugin dashboard. It gives you access to ready-to-use widgets already connected to your IDX Broker account.
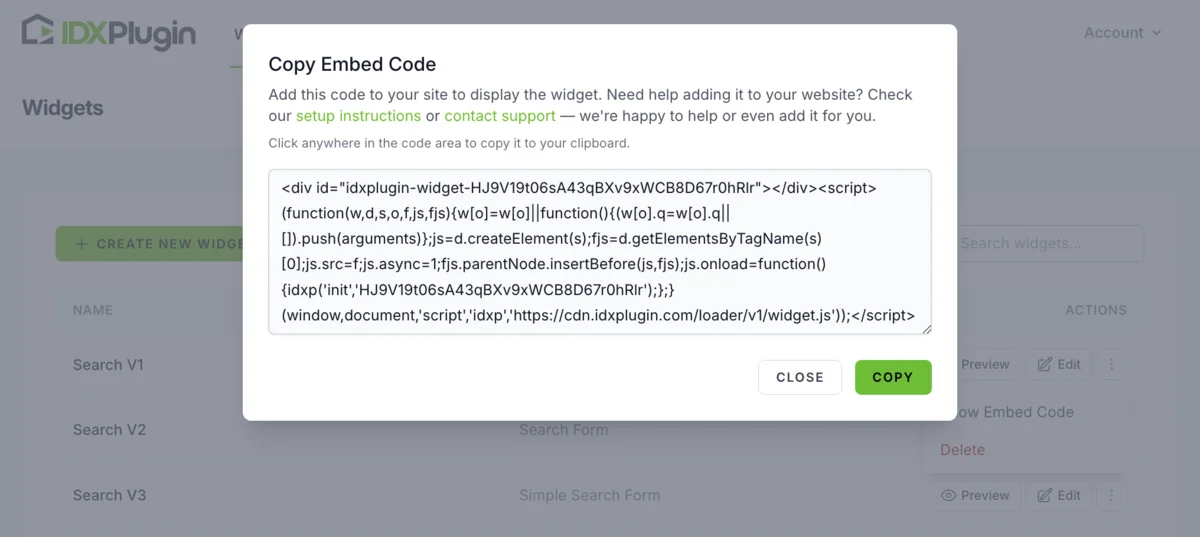
2. Find the Search Form widget you want to use. For this guide, we'll use the prebuilt "Search V1." Click "Show Embed Code" to get the HTML snippet.
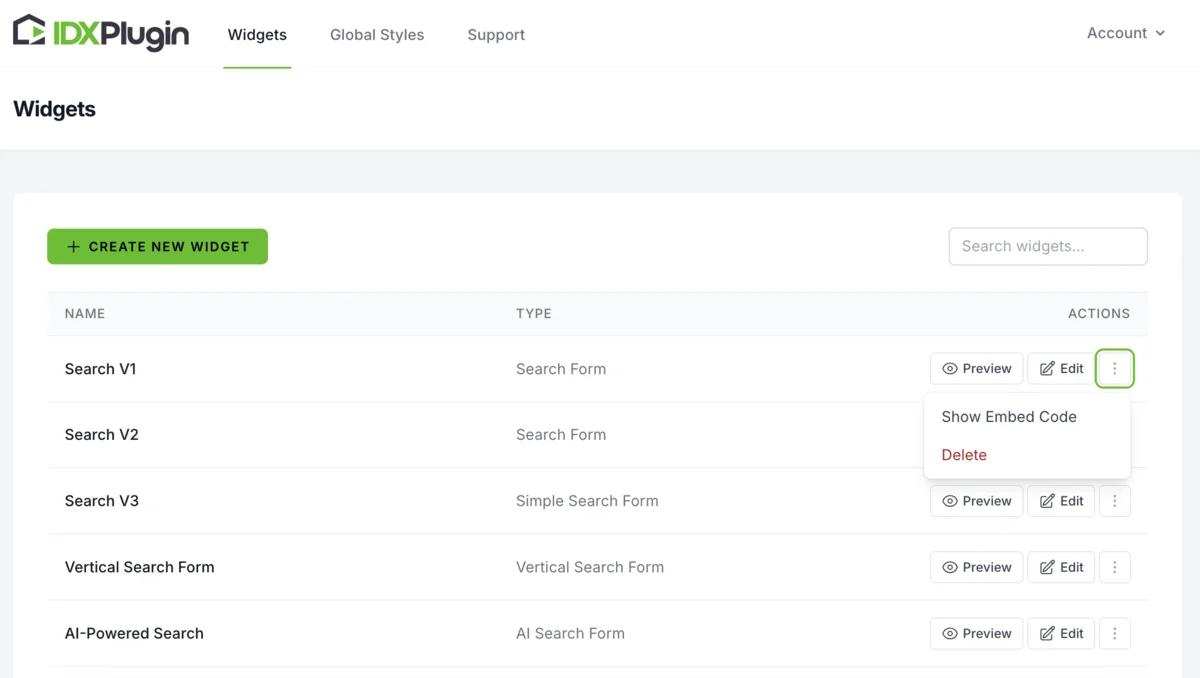
3. Copy the generated code from the popup.
Now switch over to Webflow:
4. Open Webflow and select the page where you want to place the search bar (usually the homepage).
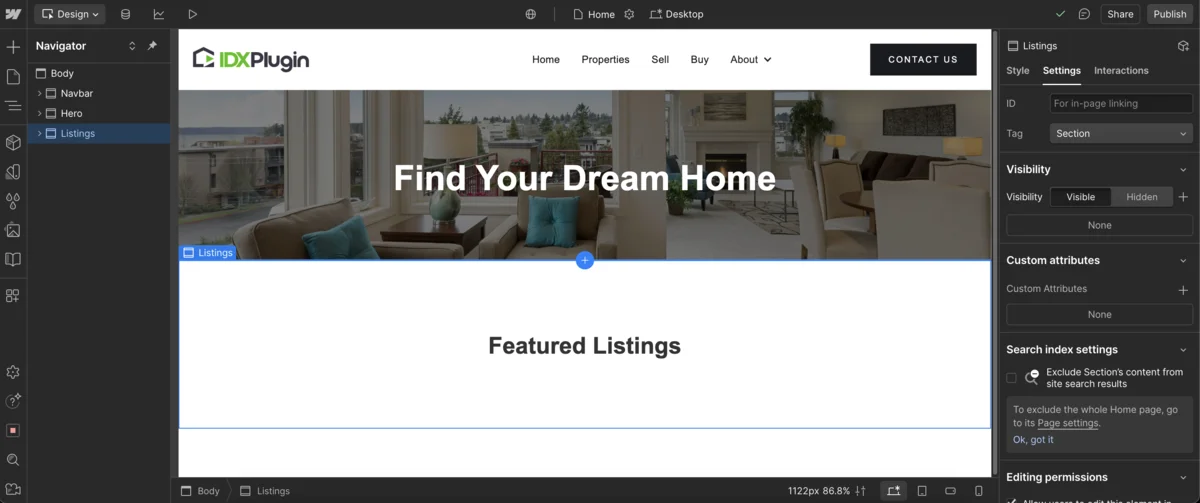
5. In the Elements Panel, search for the widget called "Code Embed."
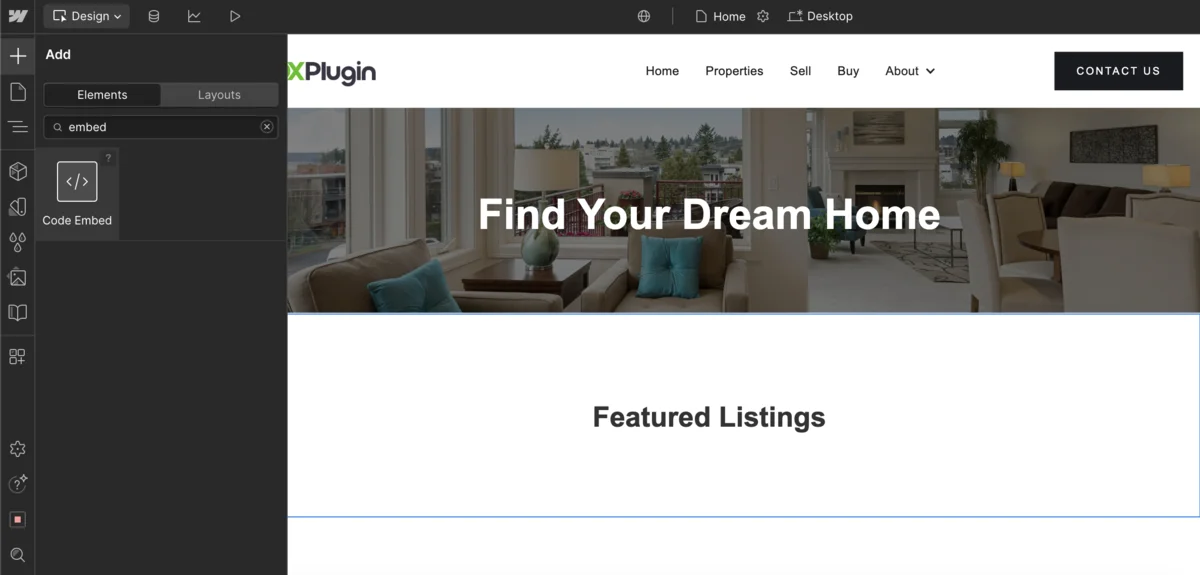
6. Drag and drop the Embed widget into the section where you want the search bar to appear.

7. Paste the code you copied earlier from IDX Plugin into the Embed widget's code area.
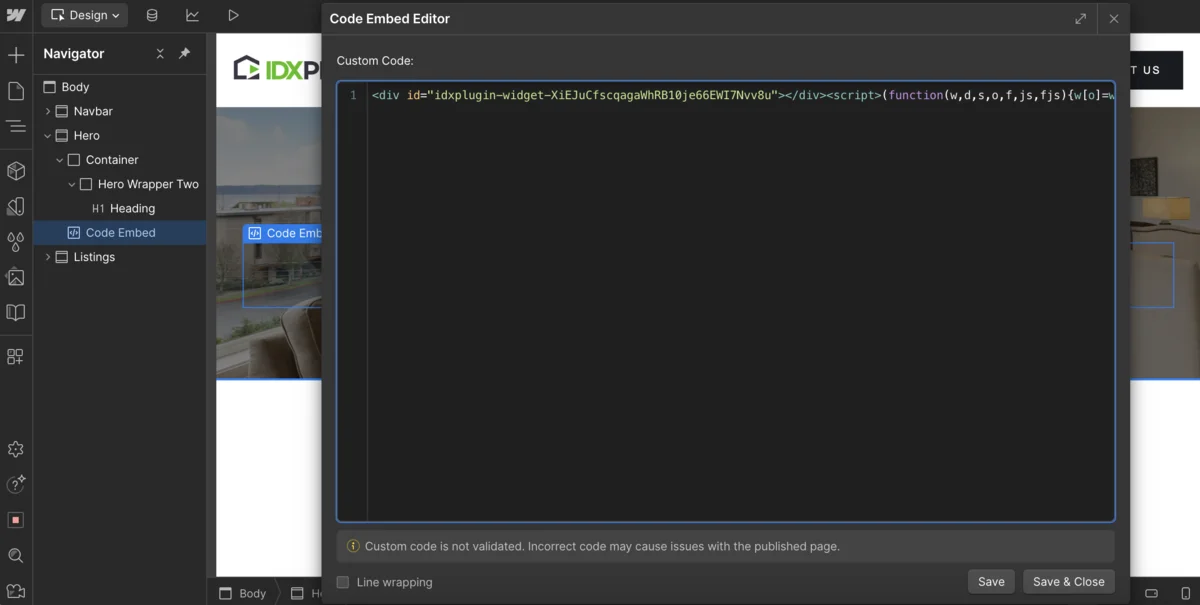
8. Webflow will show a gray placeholder in the Designer. That's normal—the live search form will only appear on your published site.
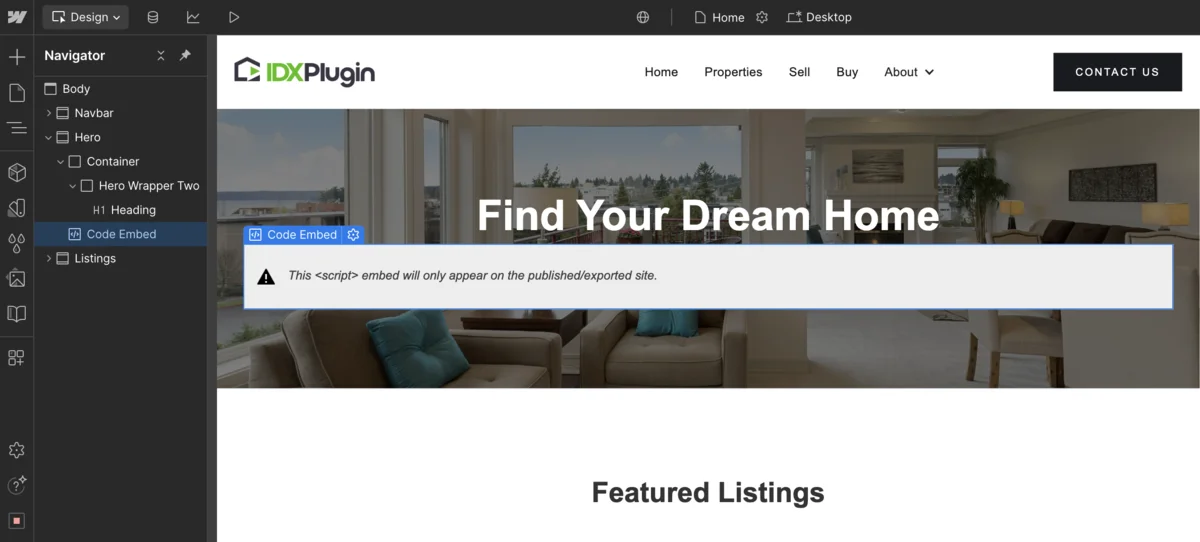
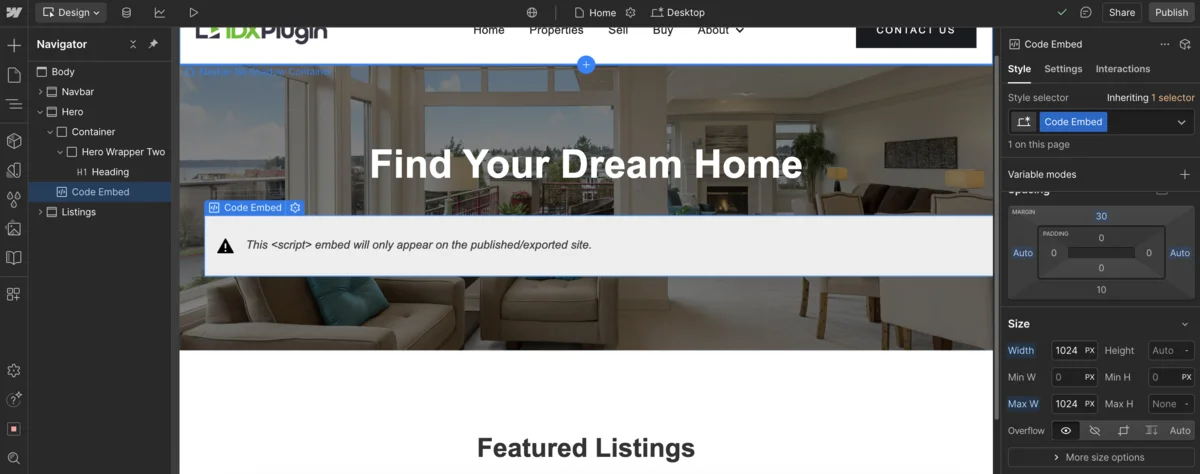
9. Use Webflow's layout tools to control spacing and alignment. In this example, we center the widget and limit the width to 1024px to keep it clean and balanced.
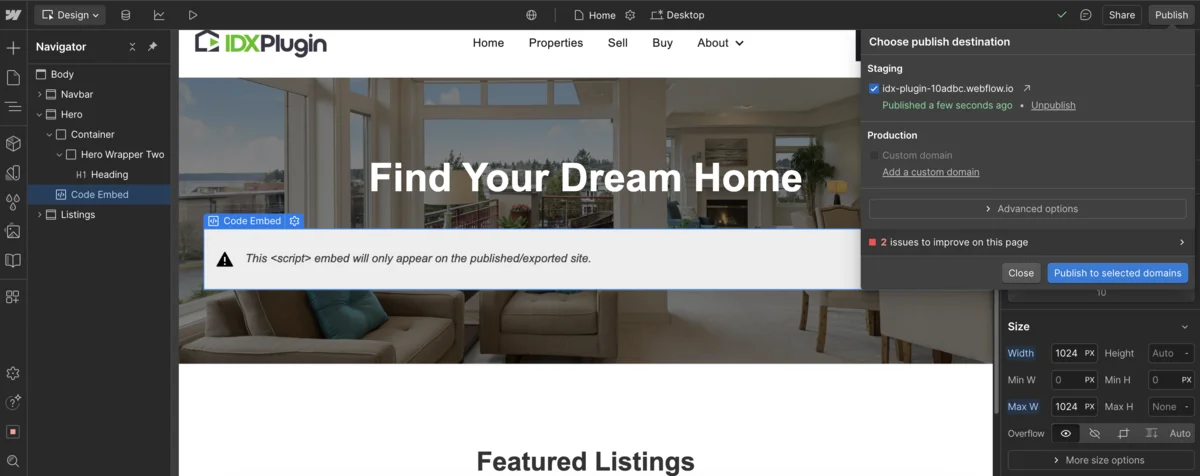
10. Click "Publish" in Webflow, then select "Publish to selected domains" to make your changes live.
11. Visit your published site—you'll now see a fully functional MLS search form powered by IDX Broker. Try typing a city or zip code. The autocomplete pulls real data from your connected MLS and redirects to a search results page. Later in this guide, we'll show you how to make those result pages inherit your Webflow header and footer.
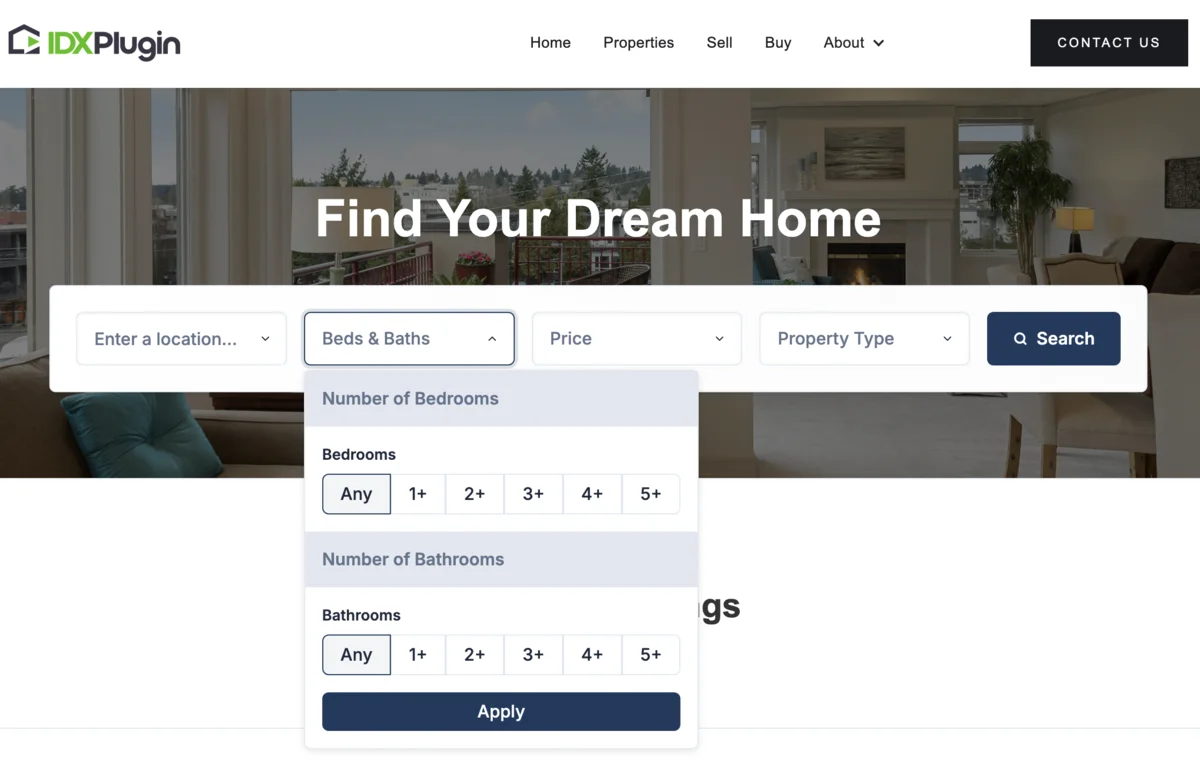
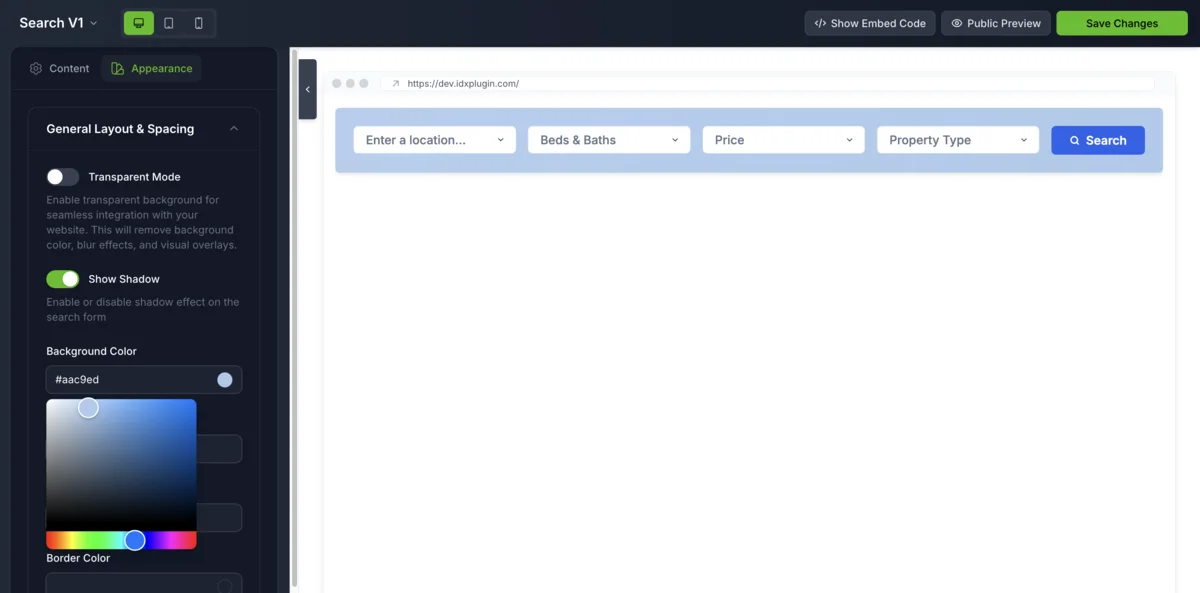
12. Want to customize the search form layout, change the field order, remove specific fields, or adjust the styling? Just go back to your IDX Plugin dashboard, click "Edit" on your widget, and use the no-code visual editor to tailor the form to your needs.
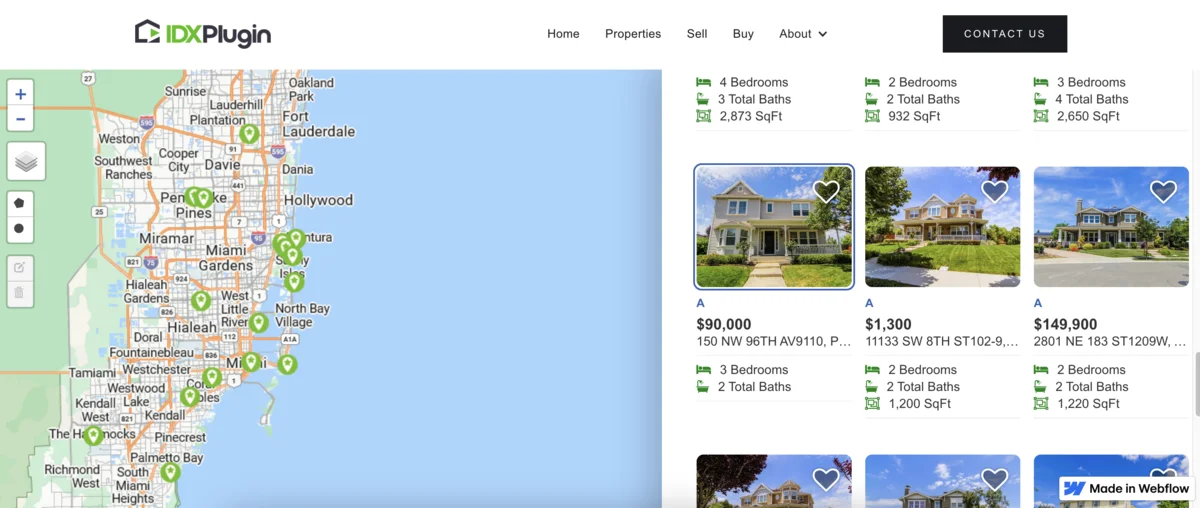
Step 2: Add MLS Listing Cards to Your Webflow Homepage or Custom Pages
Listing cards are a key part of any real estate website—they allow you to highlight properties in a clean, scrollable format that's both visual and easy to browse. With IDX Plugin, you can embed MLS-powered listing grids or carousels directly into your Webflow pages, filtered by location, price, property type, and more.
1. Choose a widget for your listing showcase
Log in to your IDX Plugin dashboard and open the Widgets section. You'll find a set of pre-built demos you can use immediately, such as:
- • Featured Listings List – a clean grid of selected listings
- • Featured Listings Carousel – rotating listings with navigation arrows
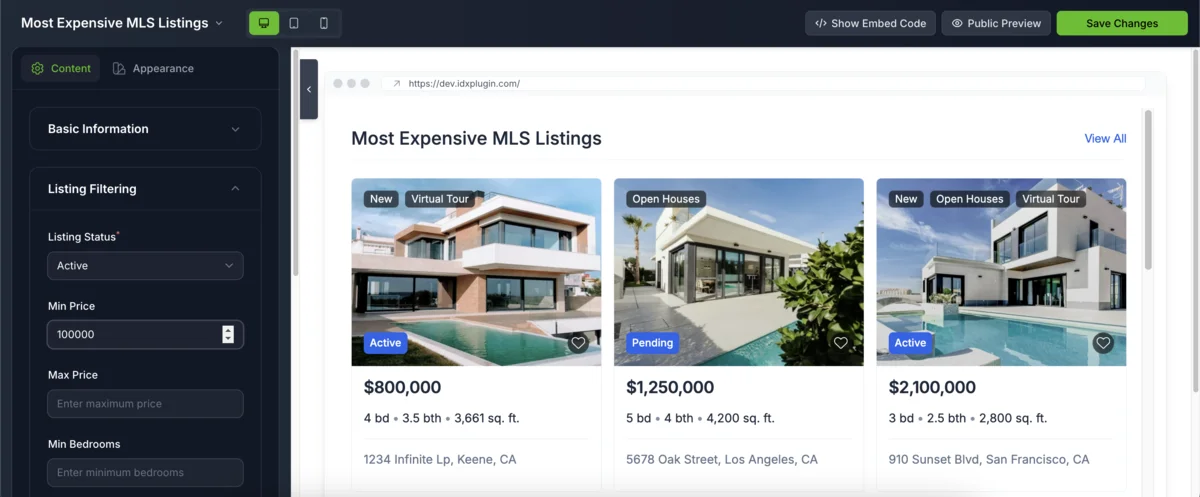
- • Most Expensive MLS Listings – automatically shows high-end properties from your MLS feed
Choose the layout that fits your design, then click "Edit" to start customizing it.

2. Configure which listings the widget displays
Use filtering tools to define what listings will appear. You can target properties by location, price range, property type, or bedroom/bath count. You can also adjust how the listings are displayed—set the number of columns, spacing between cards, image ratio, and label styles.
3. Get the embed code
Once the widget looks the way you want, click "Public Preview" to see how it performs with live data. Then click "Show Embed Code" and copy the code snippet—just like with the search form.
4. Add an Embed block on your Webflow page
Open your Webflow project, go to the page where you want to show the listings (such as the homepage or a custom "Neighborhood" section), and insert a Code Embed element.
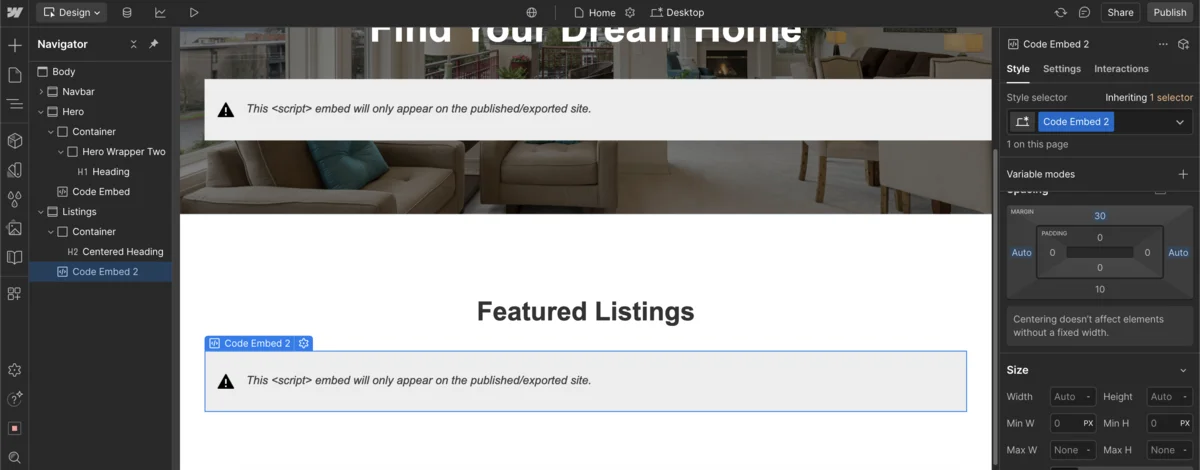
5. Paste the code
Paste your embed code into the block and click save. Then publish your Webflow site to apply the changes.

You'll now see MLS-powered listing cards appear on your page—fully responsive, filterable, and always up to date with your IDX Broker feed. You can repeat this process to create additional widgets for specific categories, price ranges, or geographic areas.
→ Need an IDX Plugin account? Register here: https://dashboard.idxplugin.com/register
→ Not signed up for IDX Broker yet? Get started: https://idxplugin.com/get-started-with-idx-broker
Step 3: Display IDX Pages with Your Webflow Navigation and Footer Using a Dynamic Wrapper
IDX Broker generates listing detail pages, search results, and tools like "Schedule a Showing" or "Home Valuation" as standalone pages. By default, they don't use your Webflow navigation or footer—but with a dynamic wrapper, you can change that. The wrapper tells IDX Broker where to place its content inside your own layout, so everything stays visually consistent.
1. Create a new static page in Webflow, name it something like IDX Wrapper, and set a clean URL slug such as idx-wrapper.

2. Webflow will generate a new blank page for you.
3. On the new page, add your existing navigation at the top and your footer at the bottom to keep the layout aligned with the rest of your site.
4. Between the navbar and footer, insert a Code Embed block.
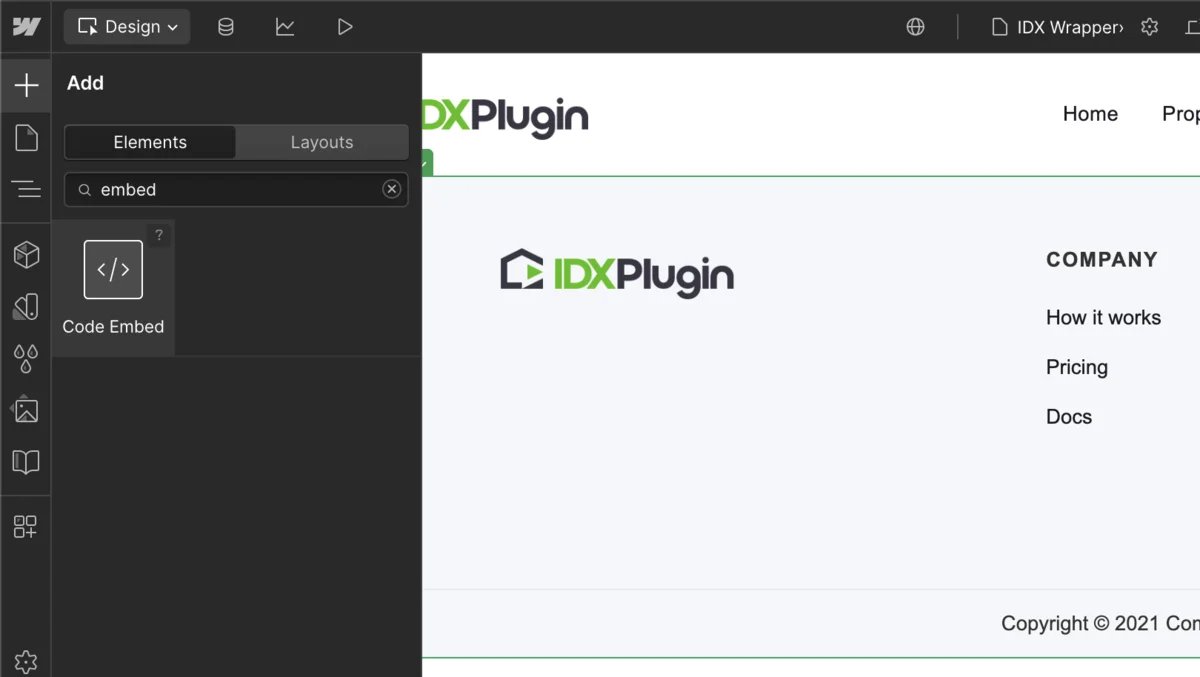
5. This is where IDX Broker will inject the dynamic content like search results or listing detail pages.
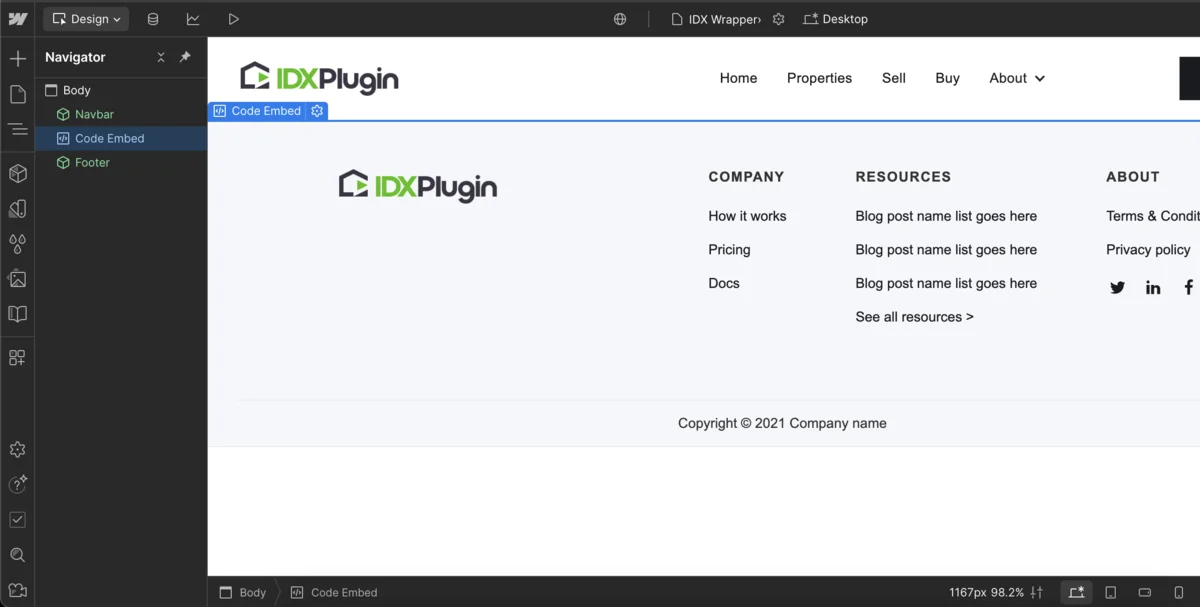
6. Paste the following code exactly as shown: <div id="idx-start"></div><div id="idx-stop"></div> — this tells IDX Broker where to insert its content.
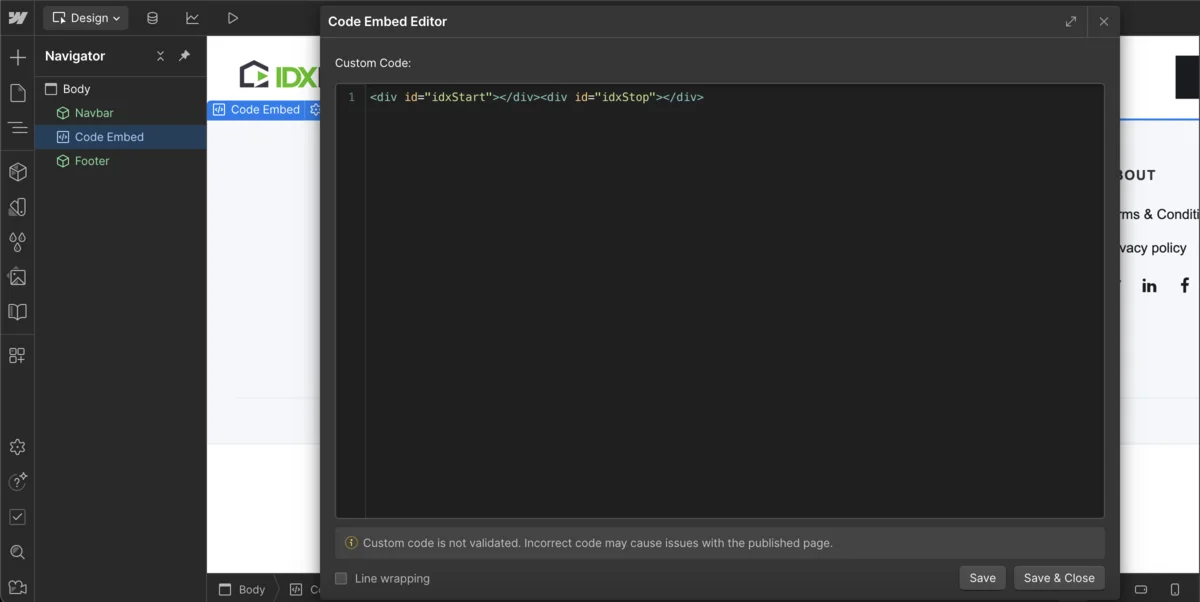
7. Publish the page and copy the full public URL of your wrapper page, it should look like https://your-site.webflow.io/idx-wrapper.
8. Log in to your IDX Broker dashboard, go to Design → Website → Wrappers → Global tab, paste your wrapper URL into the Dynamic URL field and click "Save Changes."
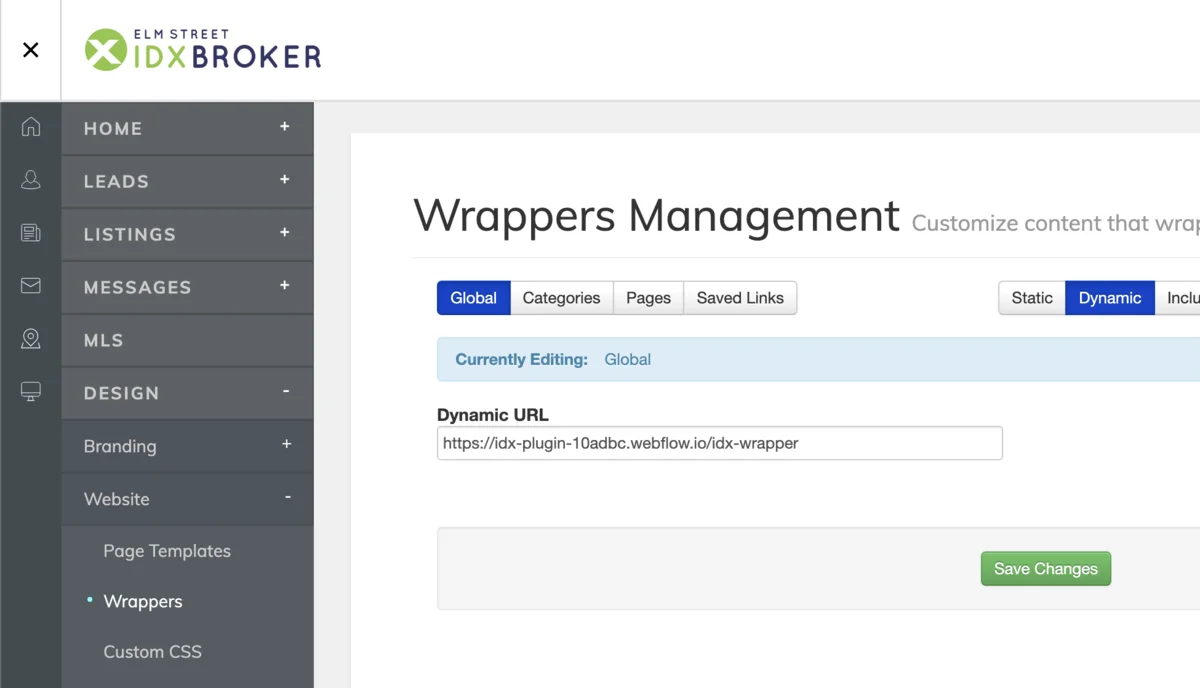
Once saved, IDX Broker will display all IDX pages—including listings, search results, and lead tools—inside your Webflow layout with full use of your site's navigation and footer.
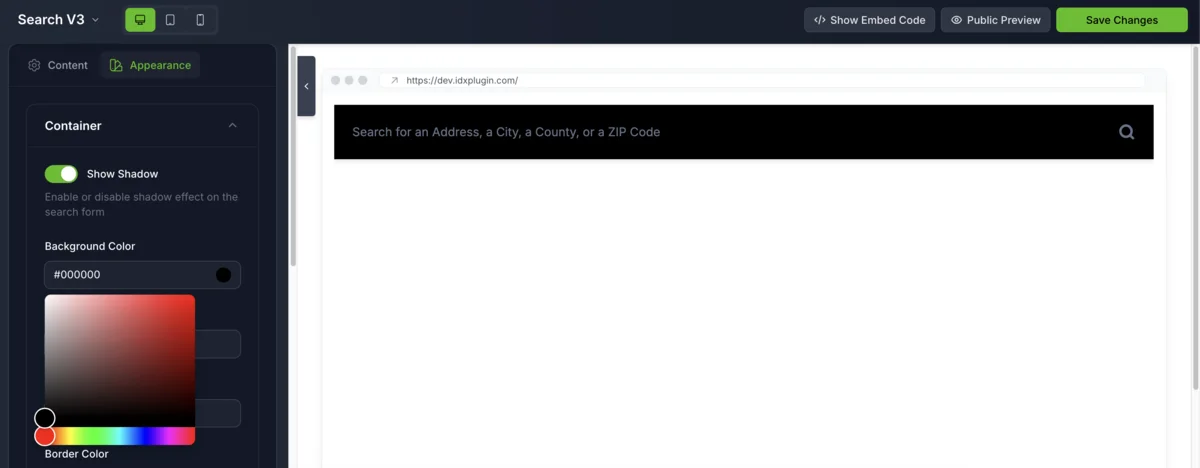
Step 4: Style the Widgets to Match Your Webflow Site
After embedding your search form and listing cards, it's time to make sure they look like a seamless part of your design. IDX Plugin includes visual styling tools so every widget matches your site's branding—without needing to write CSS.
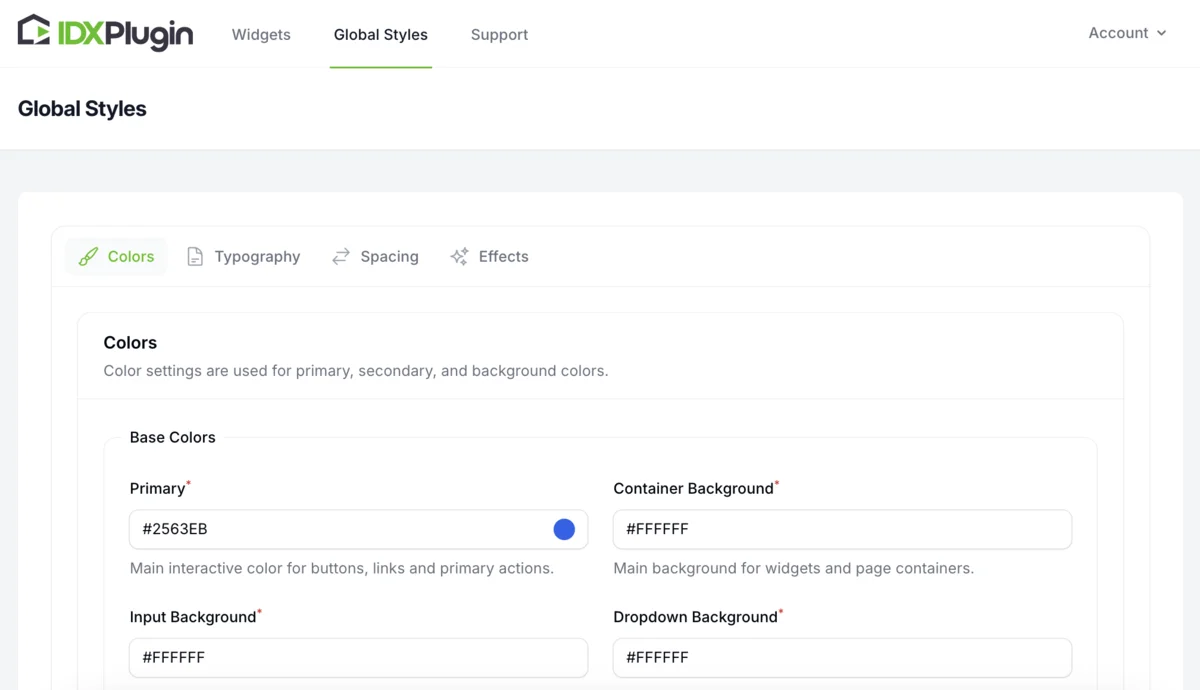
1. Global Design Settings
Inside your IDX Plugin dashboard, open the Global Settings section to define your overall widget style. You can adjust fonts, colors, button shapes, spacing, and corner radius. These settings apply across all widgets automatically, ensuring your MLS elements stay visually consistent with your Webflow layout.
2. Customize Individual Widgets
If you want a specific widget to stand out (like a featured listings section or homepage banner), you can override the global design. Just click Edit on any widget, open the Appearance tab, and fine-tune options like layout, color, font size, and spacing.
Step 5: Get Free Help from Our IDX Plugin Team
Need help setting up your integration or making sure everything looks and works perfectly? We're here for that—and it's completely free.
Whether you've already signed up for IDX Broker or haven't started yet, you can take advantage of our Free Partnership Plan. There's no commitment, no contract, and no pressure. As long as your IDX Broker account is connected to our plugin, our team can help with:
- • Setting up your first search form or listing cards
- • Connecting your IDX Wrapper inside Webflow
- • Troubleshooting display or layout issues
- • Customizing search filters or widget sections
- • Optimizing for SEO and mobile responsiveness
We've helped hundreds of real estate websites go live with fast, modern IDX solutions—and we'd love to help with yours too.
→ Reach out anytime here: https://idxplugin.com/contact
Summary: The Easiest Way to Add MLS Listings to Your Webflow Website
By combining IDX Broker (for MLS data) with IDX Plugin (for visual styling), you can turn your Webflow website into a full-featured, lead-focused real estate platform—without writing code.
Here's what you get:
- • Live MLS listings that update automatically
- • Visual customization tools that match your Webflow branding
- • Easy-to-use widgets you can drop into any page
- • Better SEO and lead generation from built-in forms and search tools
With this integration, your site becomes more than just a brochure—it becomes a fully functional, search-driven real estate engine.
You don't need custom development, a large team, or a big budget to launch a professional website with MLS listings. Webflow + IDX Broker + IDX Plugin gives you everything you need to build a fast, mobile-friendly, and SEO-optimized site in just a few steps.
What to do next
→ Don't have an IDX Broker account yet? Start here: https://idxplugin.com/get-started-with-idx-broker
→ Need a free IDX Plugin dashboard? Register here: https://dashboard.idxplugin.com/register
→ Want help reviewing or setting up your project? Contact us: https://idxplugin.com/contact
Get Started Today
New to IDX Broker? Get the complete solution. Already have IDX? Test how our widgets work with your account in under 3 minutes.